
Hospitality AI for Bed Audits
Published:
Automating Bed Cleanliness Audits: A Technical Deep Dive
Introduction
I recently had the opportunity to compete in the latest RoboRoarZ international robotics competition in Singapore. Immersed in the AI challenge, I was tasked with a problem that bridges the gap between robotics and the hospitality industry: Automating Bed Cleanliness Audits. The goal was to develop a Machine Learning model capable of determining if a bed is properly made and pinpointing specific “critical flaws” that require attention.
To build a reliable system, I structured the development into five progressive technical milestones:
- Binary Classification: Distinguishing between an “organized” and a “messy” bed
- Object Detection: Identifying specific housekeeper oversights (e.g., stray linens, wrinkles, or debris)
- Spatial Localization: Implementing bounding boxes to provide precise coordinates for detected flaws
- Geometric Alignment: Using computer vision to verify if pillows are centered and correctly aligned
- Stress Testing: Evaluating the model’s robustness against difficult lighting and complex room scenarios
While the competition provided ready-to-run Google Colab notebooks, I wanted to take full control of the development lifecycle. I transitioned to a local development environment, where I built a custom pipeline to integrate YOLO for object detection and ResNet for classification. By moving away from managed cloud scripts, I gained a deeper understanding of dataset management, hyperparameter tuning, and real-time image processing using OpenCV to bridge the gap between model output and actionable data.
Workflow Overview
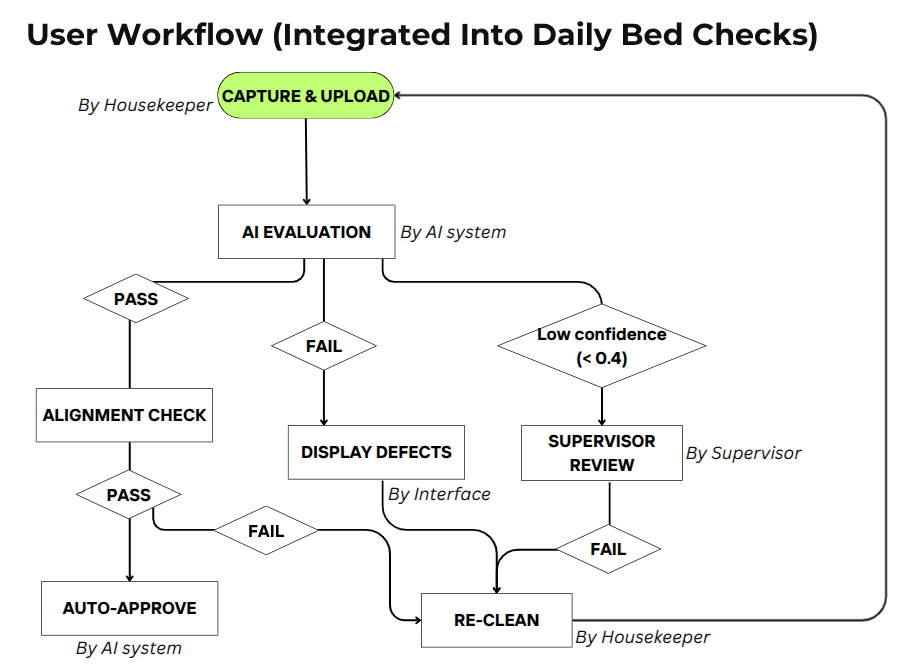
Program workflow and design.
Stage 1: Binary Classification
Dataset Preparation
At the start of the competition, we were provided with a large dataset of around 1,700 images of hotel beds, already separated into two categories: Made and Unmade. From this raw dataset, our task was to restructure and curate the data into a format suitable for training a deep learning classification model.
For this project, I used ResNet-18 to train a model that identifies whether a bed is made or unmade. As ResNet-18 follows standard image classification conventions, the dataset needed to be organized into one of two common directory structures:
- 80% train, 20% valid
- 70% train, 20% valid, 10% test
I chose the latter configuration, as having a dedicated test set allows me to run inference on unseen data and obtain a more reliable estimate of the model’s real-world performance.
There are several ways to split data into the correct structure for model training. During initial testing, I uploaded around 100 images from each category to Roboflow, a platform used to create and manage datasets for machine learning models. While this was sufficient for early experimentation, scaling up to the full dataset of around 1,700 images proved impractical, as the time required for uploading and downloading the data was too long. As a result, I wrote a simple script to split and organize the dataset locally into the required directory structure. This approach removed the dependency on external tools, allowed faster iteration, and gave better control over the data pipeline. Handling the dataset locally significantly improved efficiency and accelerated overall project progress.
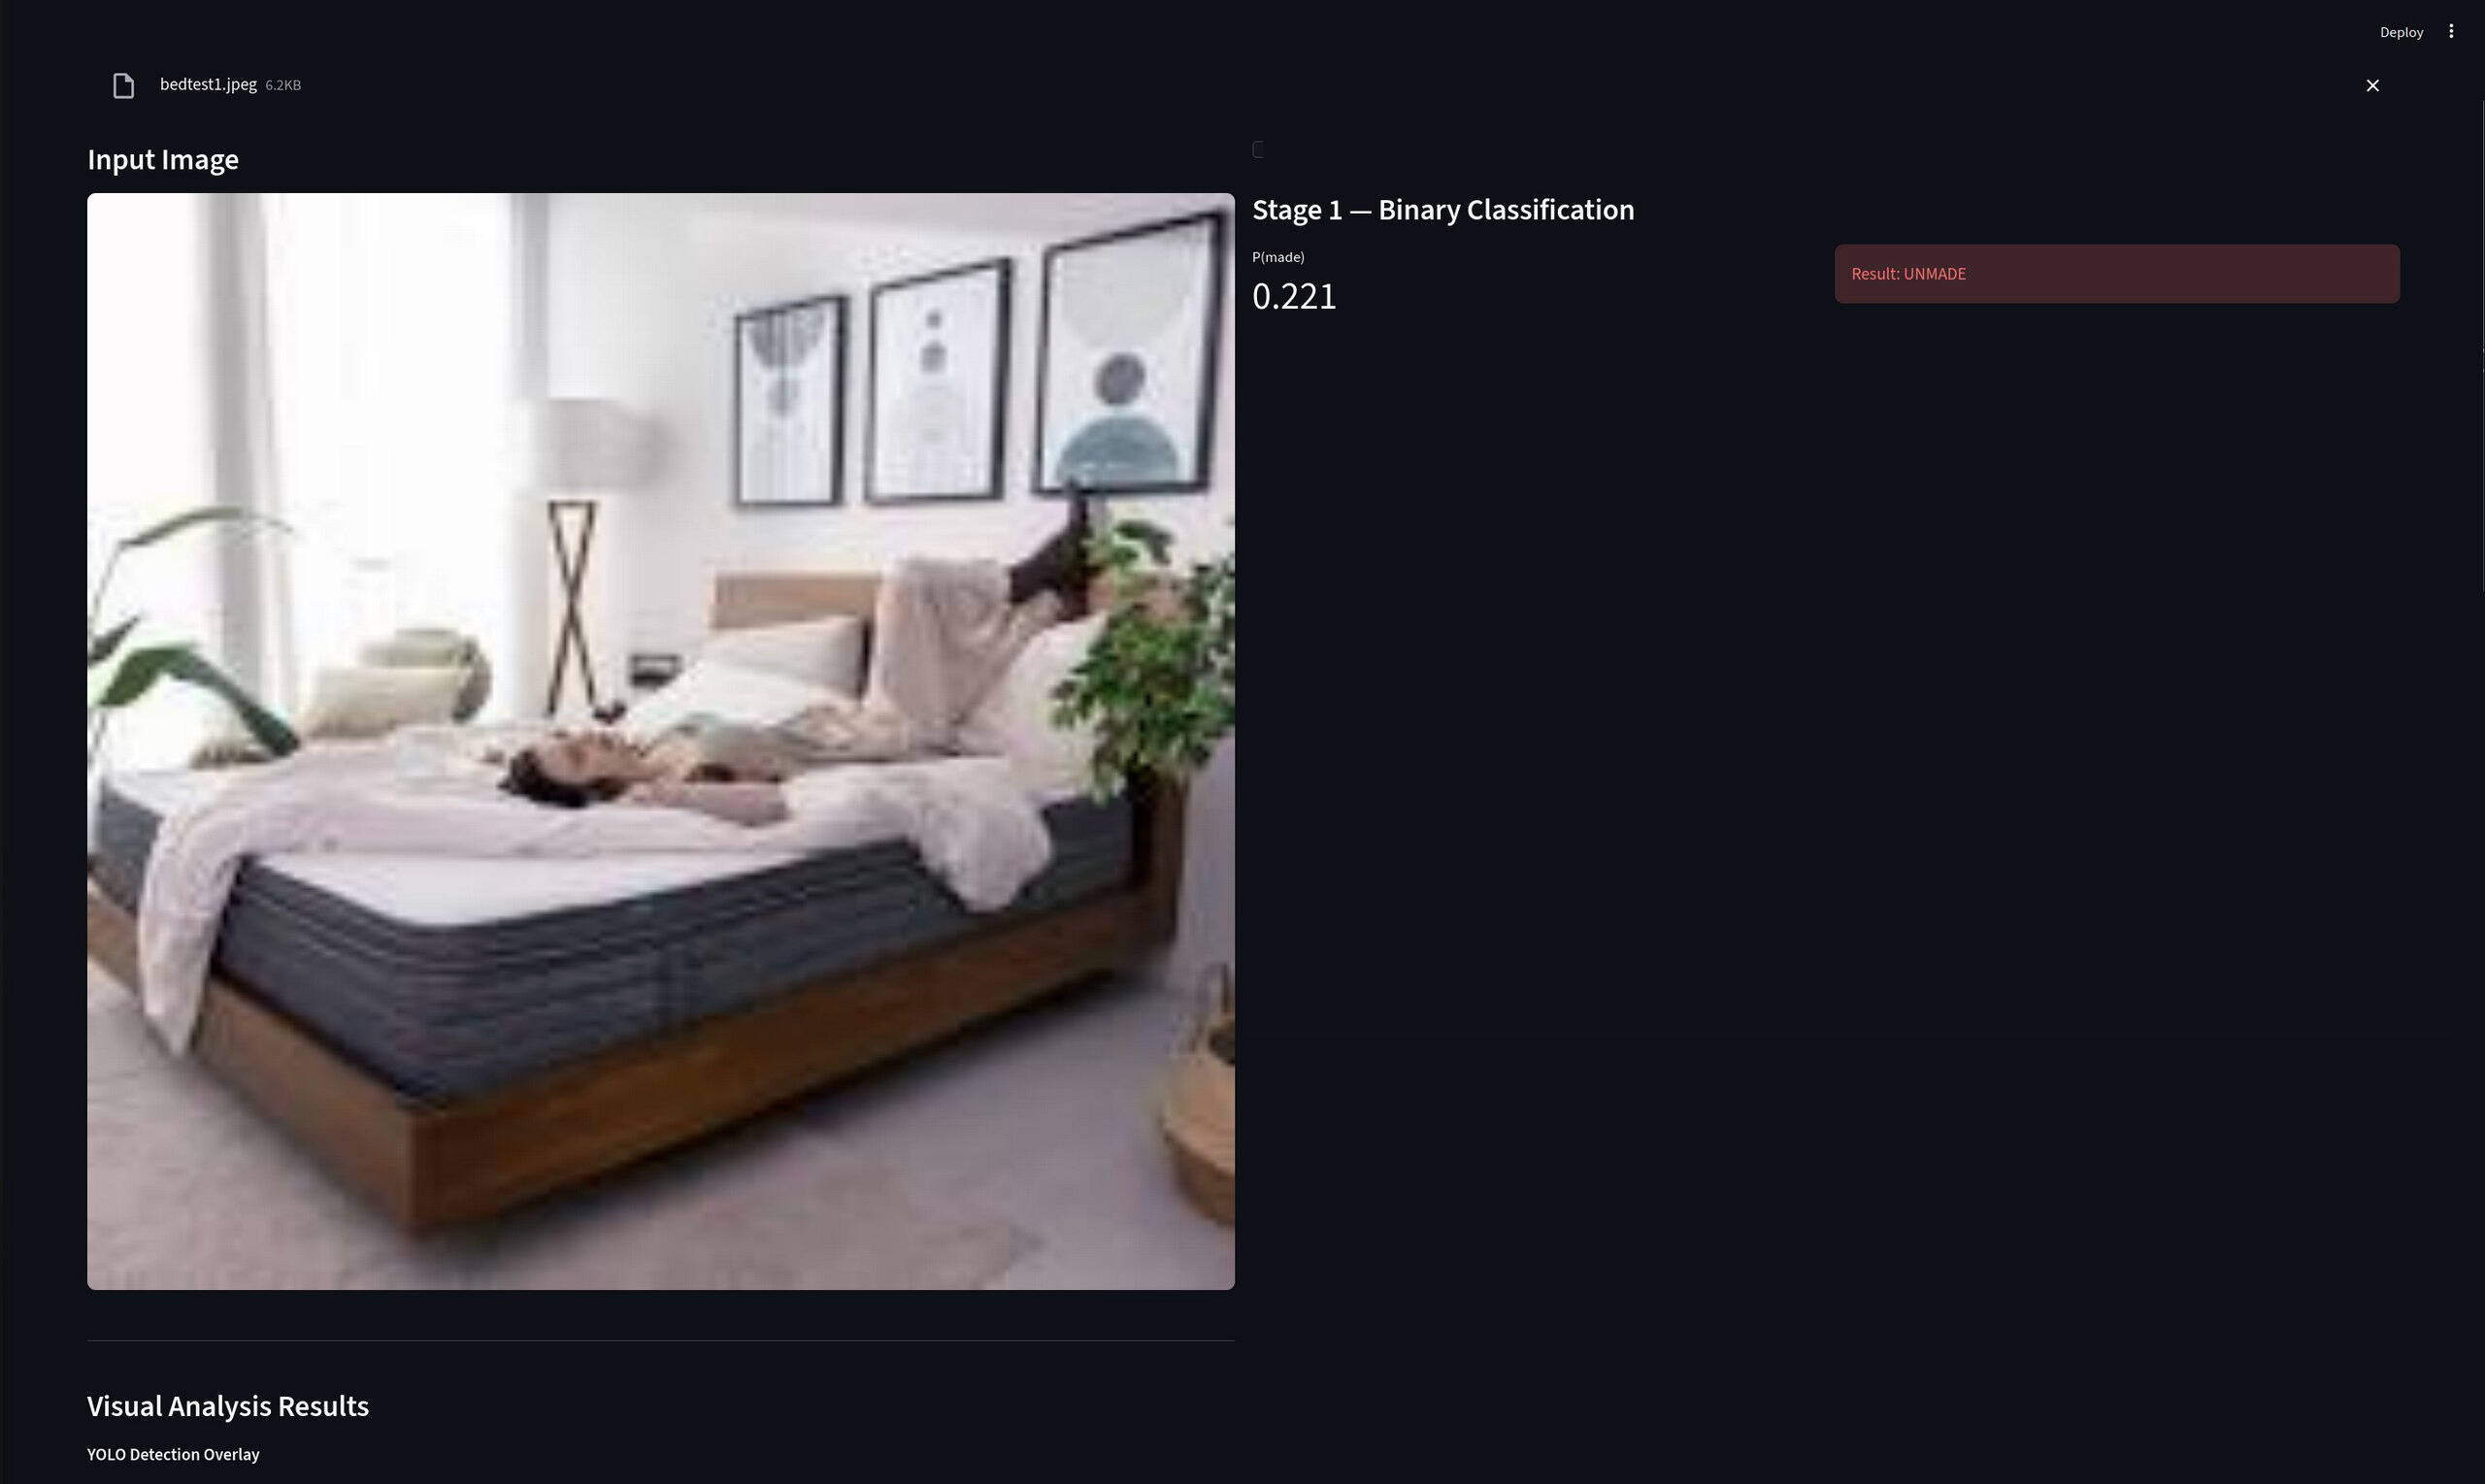
Demonstration of interface during stage 1.
Model Architecture Selection: Why ResNet-18?
Given the hackathon’s time constraints and the need for rapid prototyping, selecting the right model architecture was critical. I chose ResNet-18 for three key reasons:
- High computational efficiency and speed: allow for local training without GPU constraints as well as quick experimentation with different hyperparameters.
- Proven robustness for Binary Classification: ResNet is known for being reliable in binary classification tasks where decision boundaries must be clear. In addition, ResNet is good at generalizing unseen test data.
While larger models like ResNet-50 or EfficientNet might have offered marginal accuracy improvements, the trade-off in training time and computational resources wasn’t justified for a hackathon setting where rapid iteration was important.
Addressing Dataset Challenges
While this setup worked well overall, I identified several issues during dataset preparation:
Class Imbalance
The dataset was slightly imbalanced, with more images of made beds than unmade beds. This imbalance can bias the model toward predicting the majority class, leading to inflated accuracy but poorer performance on unmade beds. To address this, I reduced the number of made bed images during training, creating a more balanced distribution that improved the model’s ability to correctly identify both classes.
Overfitting Risk
Since the dataset was relatively small by deep learning standards, there was a clear risk of overfitting, especially when training a convolutional neural network such as ResNet-18. However, this was identified at a very early stage of the project, so I chose to acknowledge the risk first and address it in later stages through more appropriate strategies and refinements once the core pipeline was established.
Stage 2 & 3: Defect Localization
Approach and Methodology
The core idea behind Stage 2 and Stage 3 was similar, as both relied on object detection. With bounding box information available at the end of Stage 2, we could apply thresholding techniques to determine whether a defect was present and localize the affected regions on the bed. This made it possible to move from simple detection to more meaningful visual feedback, highlighting specific problem areas.
Data Annotation
For this phase, images were uploaded to Roboflow and manually annotated. Roboflow’s built-in segmentation assistance helped speed up the labeling process and ensured more consistent annotations across the dataset. Defects were grouped into three categories: “Untucked Sheets,” “Wrinkles,” and “Items,” which were chosen to reflect the most common and visually distinguishable bed preparation issues. Defining clear classes early on helped reduce ambiguity during training and evaluation.
Model Selection: Why YOLOv8n?
For object detection, I chose YOLOv8n (the nano variant) over larger and newer models like YOLO11 for several strategic reasons:
Fast Inference Speed
YOLOv8n is specifically optimized for real-time applications, offering:
- Inference times of 5-10ms per image on GPU, compared to 20-30ms for larger variants
- Ability to process video streams in near real-time if needed
- Low latency critical for the Streamlit deployment, ensuring responsive user experience
Computational Efficiency
With only 3.2 million parameters, YOLOv8n provided:
- Rapid training cycles (30-45 minutes per epoch vs. 2+ hours for YOLO11)
- Lower GPU memory requirements, allowing larger batch sizes
- Feasibility of running on edge devices or lower-spec hardware in production
Hackathon Pragmatism
While newer models like YOLO11 offer incremental accuracy improvements, the trade-off wasn’t justified because:
- The accuracy difference (2-3% mAP) was minimal compared to the 5x increase in training time
- Quick iteration and experimentation were more valuable than marginal performance gains
- YOLOv8n’s maturity meant better documentation and community support for troubleshooting
This choice exemplifies a key engineering principle: selecting “good enough” solutions that maximize iteration speed rather than chasing theoretical optimality when time is constrained.
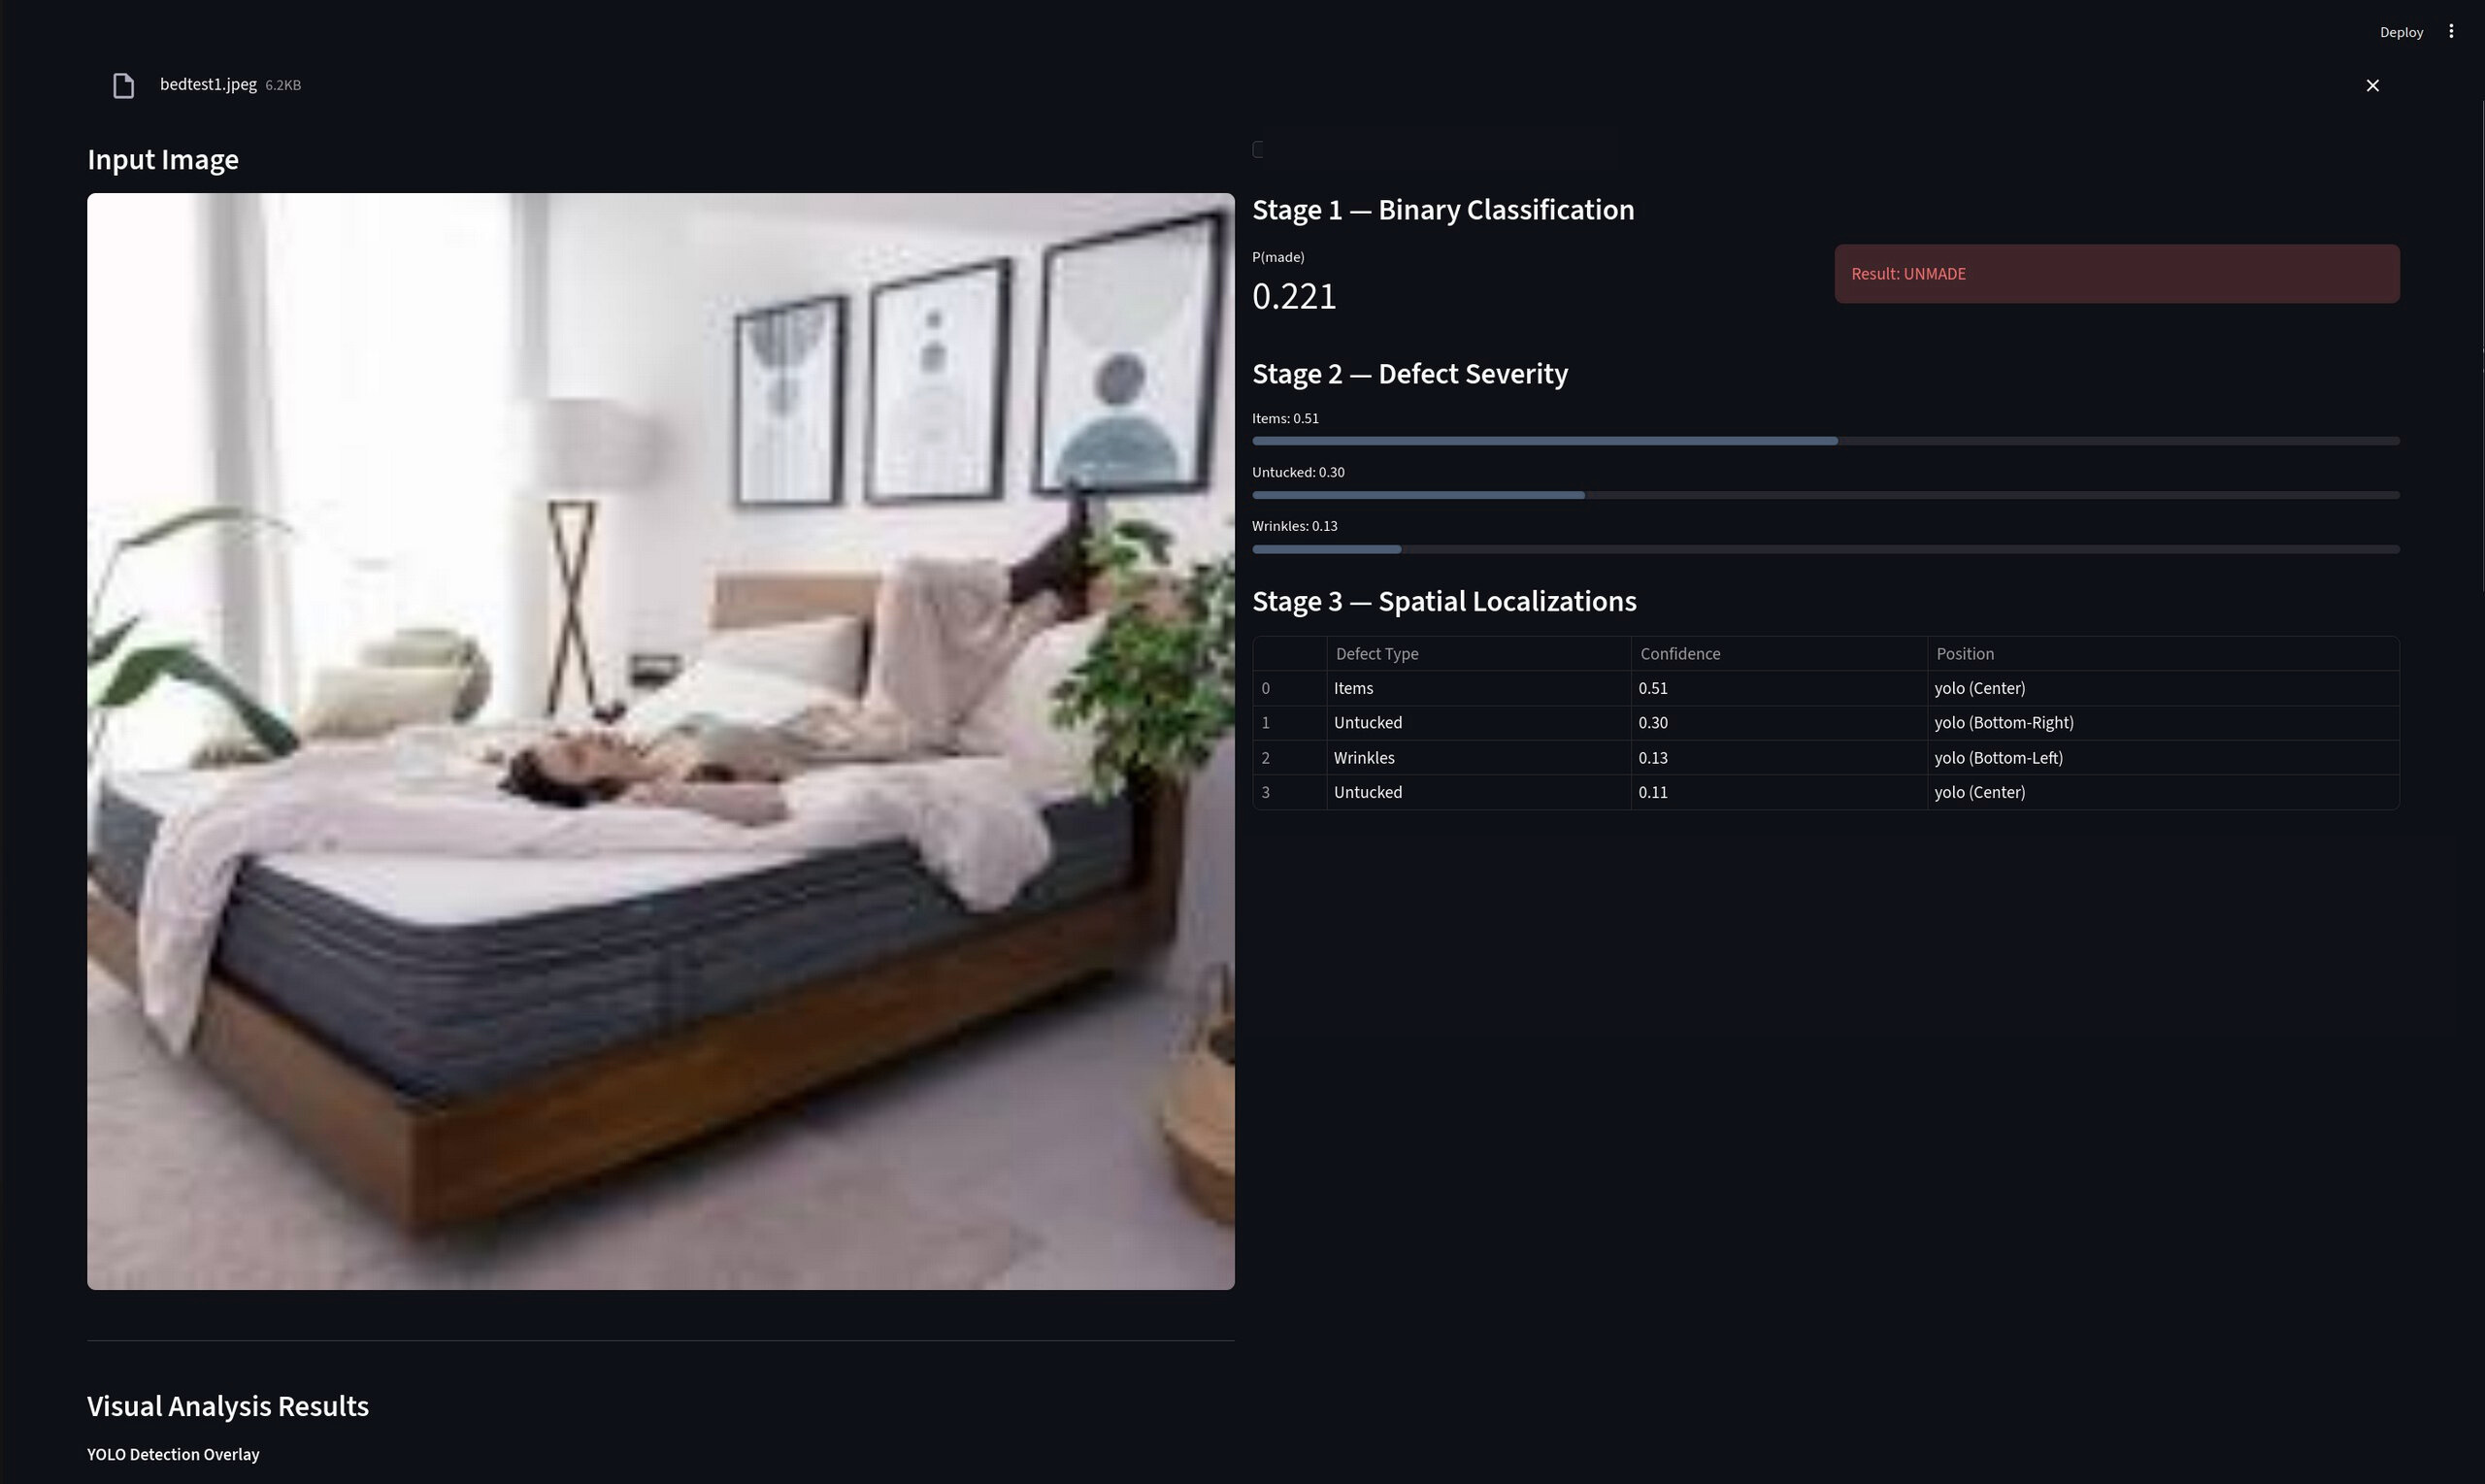
Demonstration of interface during stage 2 and 3.
Observed Challenges
From the training results, we can see that the labels are now more evenly distributed across categories, which reflects our attempt to reduce the bias observed in Stage 1. While this helped improve class balance, it also revealed a new issue: background objects were frequently being detected as valid defect categories.
In hindsight, this phenomenon can be partly attributed to my dataset selection process. As shown in our Stage 2 workflow, the object detection model is only activated when a bed is first classified as unmade. Because of this assumption, I selected only images of unmade beds for training. Consequently, the model was rarely exposed to clean or irrelevant background regions without defects. This lack of negative background examples led to an increase in false positives, as the model learned to associate background features with defect classes, reinforcing background bias.
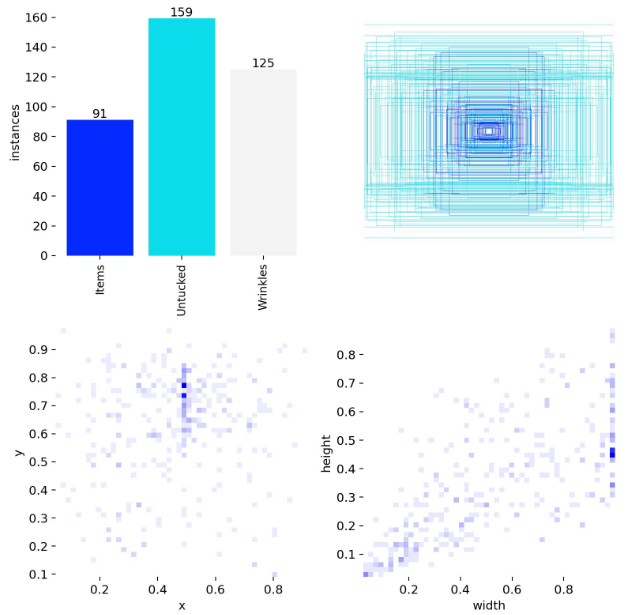
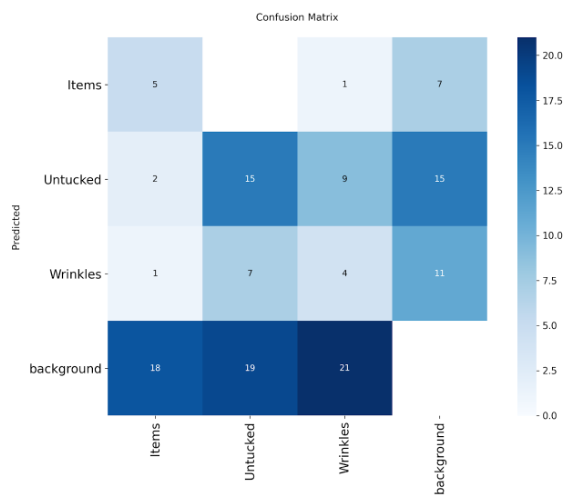
Label in dataset (left) and confusion matrix (right).
Stage 4: Geometric Alignment
Problem Statement
This bonus challenge required teams to apply traditional computer vision methods to judge the alignment of pillows relative to the bed. While the problem cannot be solved perfectly, I particularly enjoyed the solution we developed due to its clear geometric reasoning.
Solution Approach
To identify the locations of pillows and blankets in an image, I first trained a specialized object detection model using annotated data containing both objects. This allowed the model to output bounding boxes for each detected pillow and for the blanket.
Using these detections, I computed the center point of the blanket and the center point of each pillow. By connecting the blanket center to each pillow center, we formed position vectors representing the relative locations of the pillows. Summing these vectors produced a single resultant vector that captured the overall direction of the pillow cluster relative to the blanket.
In an ideal case where the pillows are properly aligned, this resultant vector should be parallel or orthogonal to the sides of the blanket. To extract the blanket’s orientation, we applied the Hough Transform to detect prominent lines in the image, including the edges of the blanket. By comparing the angle between the resultant vector and the detected blanket edges, we were able to quantify alignment quality and assign a normalized score between 0 and 1.
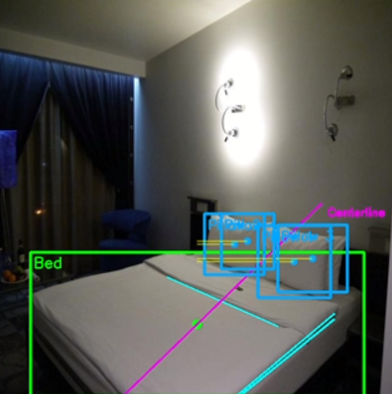
Checking pillow allignment using traditional methods.
Training Challenge: Overcoming Local Minima
During the training of the pillow recognition model, I encountered a significant optimization challenge. The training loss plateaued at approximately 0.95 and remained stagnant for multiple epochs, indicating the optimizer had become trapped in a local minimum. This plateau meant the model wasn’t learning meaningful features and couldn’t distinguish between pillows and background elements effectively.
To address this issue, I adjusted the early stopping patience parameter in the training configuration. Initially set to 15 epochs, I increased it to 50 epochs. This modification allowed the optimizer more time to:
- Explore the loss landscape without prematurely terminating training
- Potentially escape the plateau through natural stochastic gradient descent fluctuations
- Continue learning even when improvements appeared to stall temporarily
The training loss eventually decreased from 0.95 to approximately 0.6, and the model’s validation accuracy improved significantly, enabling reliable pillow detection for the geometric alignment task.

Demonstration of interface during stage 4.
Stage 5: Evaluating Model Robustness
Robustness Evaluation Methodology
An ideal computer vision model should remain reliable even under challenging real-world conditions such as motion blur, poor lighting, or low image quality. To quantify this, we defined a robustness evaluation method based on prediction consistency.
Each original image was first augmented using techniques such as Gaussian blur, contrast adjustment, and noise injection. The models from Stage 1, Stage 2, and Stage 4 were then run on both the original and augmented images. The consistency between the two outputs was measured and normalized into a robustness score between 0 and 1.
Custom Data Augmentation Pipeline
To improve robustness, I implemented a custom data augmentation pipeline using OpenCV. This approach provided fine-grained control over augmentation parameters, which was more flexible than using predefined configurations.
Stage 1 Augmentations (Classification):
- Brightness and color temperature adjustments
- Light and heavy Gaussian blur
- Motion blur
- Small rotations (±10 degrees)
- JPEG compression artifacts
- Gaussian noise
- Perspective transformations
- Random occlusions
Stage 2 Augmentations (Object Detection):
- Motion blur in different directions
- Contrast changes
- Gamma correction
- Varying noise levels
Handling Edge Cases: Unusual and Partially Visible Beds
One critical aspect of building a production-ready model is ensuring it can handle edge cases that deviate from ideal training conditions. Real-world hotel rooms present numerous challenges that a model must gracefully handle.
Challenges Identified:
- Partially Visible Beds: Beds cropped at image boundaries, obscured by furniture, or captured at extreme angles
- Unusual Bed Configurations: Bunk beds, sofa beds, non-standard bedding styles
- Occlusions: Luggage on beds, people in frame, partial curtain coverage
- Extreme Lighting: Harsh shadows, backlighting, very dim rooms
Augmentation Strategy for Edge Cases:
To address these scenarios, I expanded the augmentation pipeline with targeted transformations:
Simulating Partial Visibility:
- Random cropping: Removed 10-30% of the image from random edges to simulate beds at frame boundaries
- Perspective transformations: Applied non-uniform scaling and skewing to mimic angled camera views
- Aspect ratio variations: Stretched or compressed images to represent different camera positions
Handling Occlusions:
- Random rectangular occlusions: Overlaid 5-15% of the image with black or random-colored rectangles to simulate objects on beds
- CutOut augmentation: Randomly masked square regions to force the model to rely on partial visual information
- Synthetic overlays: Occasionally added simulated objects (luggage shapes, human silhouettes) using image compositing
Lighting Variations:
- Extreme brightness/darkness: Extended beyond standard ranges to include very dark (0.2x original) and very bright (2.5x original) scenarios
- Shadow simulation: Applied gradient masks to create realistic shadow patterns
- High dynamic range compression: Simulated both overexposed and underexposed regions within the same image
Results and Impact:
After retraining the models with this expanded augmentation dataset, images that originally had low robustness scores showed noticeable improvement, with scores increasing from around 0.3 to 0.4-0.5 in some cases. More importantly:
- False negative reduction: Partially visible beds that were previously missed were now correctly identified
- Occlusion handling: The model learned to detect bed status even with 20-30% of the bed obscured
- Lighting resilience: Performance under poor lighting improved by approximately 25% as measured by prediction consistency
Images that were already easy to classify showed minimal change, indicating that augmentation mainly benefited difficult edge cases without degrading performance on standard scenarios.
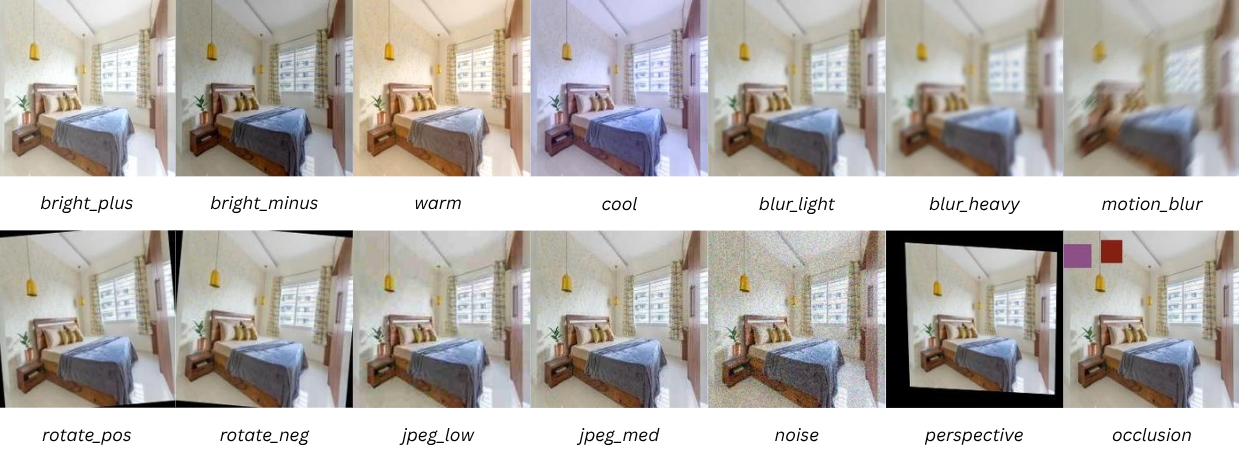
Examples of augmented images used in training.
Deployment
Web Application Architecture
To transform the model into a practical tool, we developed a lightweight web application using Streamlit. The platform was designed to support collaboration between housekeepers and supervisors.
User Workflow:
Housekeepers can upload images of beds they have finished preparing, which are then evaluated by the model. For cases where the model is uncertain (confidence below 0.75), human judgment is incorporated to reduce the risk of incorrect decisions.
Admin Interface:
An additional admin interface was implemented to display:
- Model outputs and predictions
- Confidence scores for each classification/detection
- Intermediate results (bounding boxes, alignment scores)
- Historical performance metrics
This transparency allows supervisors to better understand failure cases and identify recurring issues, such as false positives or misclassifications. By combining automated evaluation with human oversight, the system balances efficiency with reliability, which is critical in real-world deployment.
[Deployment screenshots]
Key Takeaways and Future Improvements
Technical Lessons Learned
Model Selection Strategy:
- Prioritizing rapid iteration over theoretical optimality was crucial in the hackathon context
- Lightweight models (ResNet-18, YOLOv8n) provided the best balance of speed and accuracy
- Transfer learning dramatically reduced training time and data requirements
Training Challenges:
- Early stopping patience tuning proved critical when encountering optimization plateaus
- Learning rate scheduling helped escape local minima
- Custom augmentation pipelines outperformed generic preprocessing for domain-specific challenges
Dataset Management:
- Local dataset handling was significantly faster than cloud-based platforms for large datasets
- Class imbalance and background bias required careful attention and iterative refinement
- Edge case augmentation improved real-world robustness without sacrificing standard performance
Future Enhancements
If I were to continue this project beyond the competition, I would focus on:
- Hard Negative Mining: Systematically collect false positive examples and retrain to reduce background bias
- Active Learning Pipeline: Implement a feedback loop where supervisor corrections automatically improve the model
- Ensemble Methods: Combine multiple YOLOv8 variants to improve detection accuracy while maintaining reasonable inference speed
- Multi-Camera Fusion: Aggregate predictions from multiple viewing angles for higher confidence assessments
- Explainability Tools: Integrate Grad-CAM visualizations to help supervisors understand model decisions
Conclusion
This competition provided an excellent opportunity to apply deep learning to a real-world problem under realistic constraints. By carefully balancing model complexity, training time, and deployment requirements, I developed a functional bed cleanliness audit system that demonstrated both technical competence and practical engineering judgment. The experience reinforced the importance of rapid prototyping, systematic debugging, and maintaining a clear focus on end-user needs throughout the development process.